Welcome


Welcome, do not let the title fool you. There are no means or resources to teach you how to hack SharePoint. What you will find here are tips and tricks for real life applications. I have many scripts that I have hacked, from other writers, to fit project requirements. I am hopeful I can share them with you so you can utilize the same information.

Requests
if you have a Request, please post them here.

Follow this format if you want to post readable code in comments

[sourcecode language="javascript"]
//your code
[/sourcecode]

Are you experiencing trouble with your children? Are they strong-willed or out-of-control? Remember most kids are not bad, they just make bad choices. Learn how to motivate and influence better choices. Visit theparenthelpcenter.com/.

Changed parents will see changed kids

InfoPath 2010 – User is in What SharePoint Groups?


Although InfoPath (IP) has its limitations, for the most part it meets and sometimes exceeds user expectations. For the last decade or so I have hacked and bent IP to meet my needs. Last year I had a requirement to hide/show views based on SharePoint (SP) User groups. Well you can do just about anything with the resources, time and knowledge. This seemed a little out of my league. So my Sr. Developer threw some code together, we added it to the form and now I was able to run rules based on the groups returned. I personally do like this solution, mainly because some people are afraid of code, and because I did not write this code, I was afraid of it. So how could I, in good conscience, write about this solution. Especially if I’m going to struggle trying to answer questions. So I kept searching for other methods. I found two separate posts discussing this same method in a codeless solution. The problem I had is both methods were missing a couple of important steps to complete. So, I combined both and added the missing details. If it wasn’t for me being a good guesser, not sure I could have solved for it.

Now I want to provide you with the codeless solution to getting what groups a user is in. Once you have this data available on your form you can begin setting rules or field values based on this. Now I could re-write the steps and add all the images, but that is a lot of work. So, instead, I thought I would provide you with the XSN file. Although the file was setup in my environment it still contains all the rules. Also as an added feature, I created a “How To View”. All the steps are documented with pics, rules and details. Though it would be easier for you to have that in hand and you can refer to it as a source. The Usergroups.xsn can be viewed and downloaded here.

InfoPath – Repeating Table / SharePoint List


Okay, it’s been a while since I have had time to post. I have done much work and barely had time to breathe. So today I wanted to discuss how to post data from an InfoPath (IP) repeating table to a SharePoint (SP) list. I will discuss two versions 2007 and 2010, well because they are going to be the most popular and more people are dealing with these versions now.

Lets begin with 2007. I had a recent requirement. The client created a form, but was struggling with getting the row data to populate when a selection was made from the corresponding dropdown field. Both IP and SP versions are 2007. Once the row populated correctly the client wanted to be able to report on the individual data. IP repeating table data is very limited in the sense you can’t really sort and filter in SP cleanly. I decided to write the repeating table data to a SP list. This was something I have never tried before, but knew it was possible. After a quick search I found a post on one of my favorites sites for IP, INFOPATHdev. The post was called “Codeless submitting InfoPath repeating table to a SharePoint list”. The user began to explain how they followed a MSND post up to the code part, but then resolved the rest using IP rules. You need to review the MSDN post to get your form setup. It was laid are fairly clear and I was able to run all the way through it including the code. I loved the functionality and how the form worked. You can follow either direction, they both seemed successful. So now I wanted to simplify this make it more dynamic. I want to pass in parameters to my code and let my code be generic, then it becomes like a cookie cutter. So once I completed the clients request I decided to venture on my own.

I learned something new, IP 2010 and SP 2010 don’t work like 2007. in fact the solution is much easier, but the documentation is limited. So I thought I would try to break it down in a shot but simple to follow step action.

  1. In SP 2010, Create your custom list
  2. Add all your fields necessary for your project.
  3. Once you are satisfied with your list, open IP
  4. In IP, it should default to SharePoint List, if not click it
  5. Click Design form
  6. Enter the URL of your newly created custom list
  7. Select Customize an existing SharePoint List
  8. Find and select your list
  9. Click Next
  10. Here you have an option to Manage multiple list items with this form (repeating section)
  11. Format and setup your form for your requirements

This was so much easier than 2007 and saved hours of work. Finally I think I like IP again.

InfoPath: SharePoint Wanted! Populate an InfoPath repeating table with SharePoint List data


I had a recent project were I needed to replicate a SharePoint (SP) list and associate them with several Content Types (CT). Mostly, the differences between the CTs were two sets of choice fields (Check boxes). Each set of choice fields (Before and After) had their own individual set of choices, hence the initial reason for using CTs. Initially I felt migrating to InfoPath (IP) and using CTs were unnecessary and useless in SP 2010. Useless because SP 2010 does not support grouping by CT anymore, Thank you Microsoft! So, I could create a field, promote it as a work around as a grouping by CT. Now the only other issue is the before and after choice fields. Do I want to create a view for each form? Do I want to create sections I can dynamically display based on the form type? Actually the answer for both is no. I started researching to see if there was a way to populate the check boxes on a form. The only solution I was able to come up with was a repeating section. Initially this is how I began. I created multiple sections for each form, added a repeating section, and then set default values for my checkbox labels or text. The first time I needed to change these default values it was a major fail. So now I started thinking how could I manage the choices using SP. That’s right, SP. I knew if I created a list I could add it as a data source. Thank to Microsoft again, in InfoPath (IP) 2010 you can no longer use rule to populate a SP list in an IP repeating table/section. In this post I will describe how I setup my SP list, data connections and the little bit of code I needed to complete this task.

Let me begin with my SP list. I created a simple custom list, with a default column “Title”. You have two options with this. You can set the Title field to not be required, or populate it with something, I used numbers, just because it was easy to set them, and I am all about easy.

Earlier I stated I had two choice fields for each form, my list will contain 2 columns for each choice field, four for each CT. One column containing the default value of the check option (Y,N,NA) and the second column will be the label or text for the option. The naming convention I used for my columns match my CTs and are as such:

Acid

  • AcidBeforeDefault – default value of blank,Y,N,NA – Choice
  • AcidBefore – Option label or text – Single line of text
  • AcidAfterDefault – default value of blank,Y,N,NA – Choice
  • AcidAfter – Option label or text – Single line of text

This type of naming and setup allows you to create a list of checkboxes and set a default value if needed. Maintenance on this type of setup can be a little confusing and I will explain why. Using Datasheet view, SPs design is set up to associate an item by row, not column, but these checkboxes are sending data to IP by column. So, if I wanted to remove an option I CANNOT delete a row. It would impact all other check boxes. To delete an option, the cell contents need to be deleted. From here you can manage the blank items in your IP repeating section using rules on the form or move the column contents up to replace the deleted item. Remember the Default value column for that label must have the same actions so default values are not changed. This list should look similar to the following:
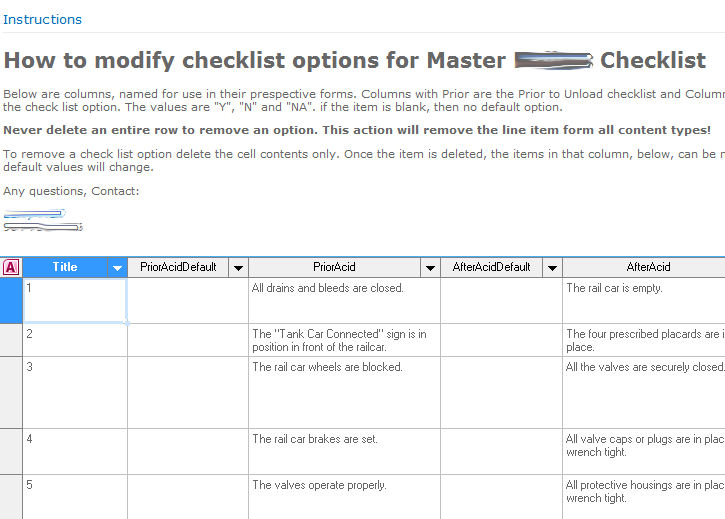

Fig.1

As you can see I added some instruction to the page for the managing user. It won’t prevent mistakes, but by adding Approval and Versioning we can avoid disaster.

Form setup

My first iteration of the form I had created sections and set default values for all the CTs. When the first request for change came in I knew there had to be a better way. I knew I could pull data from SP and populate an IP repeating table. The question was how can I accomplish this dynamically, so I don’t need a section in the schema for each CT. In order to populate the form from SP I needed to go to a coded solution. So I decided why not add a couple more lines of code which will allow me to populate fields on form load, CT being one of the fields.

I created a field in my schema called ContentType. In the form load options I will search the URL for a query string parameter and set that value to the form field, ContentType.

XPathNavigator root = CreateNavigator();
string TRValue = "Nothing";
XPathNavigator TRnode = root.SelectSingleNode("/my:myFields/my:ContentType", NamespaceManager);

I start by setting my parameter to “Nothing”, and create my XPathNavigator to my field. Now I have a value and a field I can set. TR is my query string parameter and if is not available I set it to nothing. Either way I have a value to set my field with. Below is the C# code to grab the query string value.

try
{
///////////////////////
     if (e.InputParameters.ContainsKey("TR"))
     {
          TRValue = e.InputParameters["TR"];
     }
     else
     {
          TRValue = defaultvalue;
     }

     if (TRnode.Value.Trim() == "")
     {
          TRnode.SetValue(TRValue);
     }
     ///////////////////////
}
catch {}

This can be place in the FormEvents_Loading for simplicity purposes. By populating the form this way I can add or remove CT without a republish of the form. How’s that for simple?

Form Schema

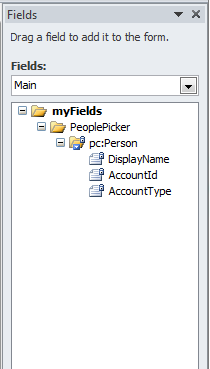
I have created my form with one main section, which will contain two nested repeating sections for my two checklists. Below is an image of this schema. Again for my naming conventions “Before or Prior” list fields start with “P_” and “After” begins with “A_”. This makes it easier for writing the code. Below display am image of the schema and a breakdown description of the key fields.


Fig.2
  • displayname = checklist label or question
  • YesNo = choice option (Y,N,NA)
  •  value = this will equal displayname only when current() YesNo value =”Y”. We have a   use for this later on where it will be explained.
  • NAComments = a comment field for the checklist section
  • lbl = has a default value of “Comments:”
  • setVal = this is used to hide/show a field specific to 1 CT and one answer.

The fields, in both sections, have the same use and function. For general purposes you only need three of these fields: displayname, YesNo and value. These are the fields I will be focused on in this post.

Now originally I chose a repeating table, but through trial and error I found a repeating section had much more flexibility. This is just a personal preference for me. Populating the data takes the same code and effort. The final look and feel is your call.

Load Dynamic Checklist

This will take a little more code. Because I am using this multiple times for each CT and multiple CT I needed to make this dynamic also. The module will be passed several strings to populate the correct section (Before or After) with the correct CT checklist choices. In the module I left contents to help identify each string. Source will be SP and Target will be IP. Some of the xpaths to fields may look a bit confusing at first, but to make it dynamic I needed to pass this data in. Also when using the Xmlwriter set all fields with a value even if not needed or they will not populate in the schema. It can be set to blank or string.Empty, it just has to be set. I was trying to execute some rules and write values to the other fields and it took me half a day to realize that if I didn’t add the additional fields they really weren’t there.

public void LoadChecklist(string sourcelbl, string sourcedefault, string targetlbl, string targetdefault, string targetVal, string targetComment, string target_lbl, string targetsetVal, string xpathParent, string xpathRow)
{
     XPathNavigator root = CreateNavigator();
     //sourcelbl = "Prior" + CT;
     //sourcedefault = "Prior" + CT + "Default";
     //targetlbl = "field1";
     //targetdefault = "field2";
     //xpathParent = "/my:myFields/my:group1";
     //repeatRow = "groupRepeat";

     //Namespace variable
     string myNamespace = NamespaceManager.LookupNamespace("my");

     //Clear previous entries
     XPathIterator tableRows = root.Select(xpathParent + "/my:" + xpathRow, NamespaceManager);

     if (tableRows.Count > 0)
     {
          for (int i = tableRows.Count; i > 0; i--)
               {
                    XPN reTableRows = root.SelectSingleNode(xpathParent + "/my:" + xpathRow + "[" + i + "]", NamespaceManager);
                    reTableRows.DeleteSelf();
               }
     }

     //Secondary data source setup
     DataSource ds = DataSources["Checklist"];
     XPathNavigator domNav = ds.CreateNavigator();
     XPathIterator rows = domNav.Select("/dfs:myFields/dfs:dataFields/d:SharePointListItem_RW", NamespaceManager);

     //Loop through the secondary data source SP
     while (rows.MoveNext())
     {
           string lblVal = rows.Current.SelectSingleNode("d:" + sourcelbl, NamespaceManager).Value.ToString();
           string defaultVal = rows.Current.SelectSingleNode("d:" + sourcedefault, NamespaceManager).Value.ToString();
          //string id = rows.Current.SelectSingleNode("d:ID", NamespaceManager).Value.ToString();

          //Populate the repeating table
          using (XmlWriter writer = root.SelectSingleNode(xpathParent, NamespaceManager).AppendChild())
          {
               writer.WriteStartElement(xpathRow, myNamespace);
               writer.WriteElementString(targetlbl, myNamespace, lblVal);
               writer.WriteElementString(targetdefault, myNamespace, defaultVal);
               writer.WriteElementString(targetVal, myNamespace, "");
               writer.WriteElementString(targetComment, myNamespace, "");
               writer.WriteElementString(target_lbl, myNamespace, "Comments:");
               writer.WriteElementString(targetsetVal, myNamespace, "0");
               writer.WriteEndElement();
               writer.Close();
          }
     }
}

String Parameters

  • sourcelbl = required, the actual text/question for the option. It is pulled from the SP list
  • sourcedefault = required, option default value. It is pulled from the SP list. Sets default option values
  • targetlbl = required, option text/question field on form
  • targetdefault = required, option value, if any, on the form
  • targetVal = required, set a default value of “”
  • targetComment = optional, set a default value of “”
  • target_lbl = optional, set a default value of “Comments:”
  • targetsetVal = optional, set a default value of “0”
  • xpathParent =  Section – Parent – xpath
  • xpathRow = Repeating Row – name of repeating row item i.e. “P_Unload”


Fig.3

Set up code to accept parameters

So now we need to set this up so we pass the correct parameters. I am also doing a check to make sure it is the first time the form is running, or has been saved. We will be using the value of this field to build some of the field strings. In the code below you can see I do my check, get my ContentType value, before the “_” and remove any spaces. This value is now used in my strings.

public void ContentType_Changed(object sender, XmlEventArgs e)
{
     string eValue = e.NewValue;
     string sub = string.Empty;
     string CT = string.Empty;
     string SaveCount = root.SelectSingleNode("//my:SaveCount", NamespaceManager).Value;
     if (SaveCount == "0")
     {
          int index = eValue.IndexOf('-');
          if (index >= 0)
          {
               sub = eValue.Substring(0, index);
          }
          else
          {
              sub = eValue; // handle strings without the dash
          }
          CT = sub.Replace(" ", "").Replace(" ", "").Trim();

          LoadChecklist("Prior" + CT, "Prior" + CT + "Default", "P_displayname", "P_YesNo", "P_value", "P_NAComments", "P_lbl", "P_setVal", "/my:myFields/my:Checklist/my:P_Unloading", "P_Unload");

          LoadChecklist("After" + CT, "After" + CT + "Default", "A_displayname", "A_YesNo", "A_value", "A_NAComments", "A_lbl", "A_setVal", "/my:myFields/my:Checklist/my:A_Unloading", "A_Unload");
     }
}

A breakdown

  • sourcelbl = “Prior” + CT – SP column name
  • sourcedefault = “Prior” + CT + “Default” – SP column name
  • targetlbl = P_displayname – form or field name
  • targetdefault = P_YesNo – form or field name
  • optional form fields
    • P_value
    • P_NAComments
    • P_lbl
    • P_setVal
  • xpathParent  = /my:myFields/my:Checklist/my:A_Unloading
  • xpathRow  = P_Unload

Loading the form

Now we needed to load the form data and be careful not to over write my checklist when it is opened for editing. The LoadChecklist module above needs to fire only once to get all my values on initial load and not run again. Using the field ContentType as my firing event I am able to run this once. On form load I set that value if it is blank. On the change event of this field I run the above code which gives us the desired results.

InfoPath, getting the SharePoint Item ID


Recently, durning an InfoPath (IP) form build, I was tasked to create a method that could capture the SharePoint Item ID. This had to be done on initial form load, because it is possible the user would need to reference this value before form completion. After much research I did find several methods that looked promising. But after much trial and error they all failed, or maybe it was me.

The first one I tried came from this post: http://www.bizsupportonline.net/browserforms/autonumber-infopath-form-submitted-sharepoint-library.htm. I have much respect for S.Y.M. Many of his post have helped me greatly. This solution is destin to cause an issue. Although it will grab the next ID, there is no garauntee that it would not be shared by more than one form and I needed the ID assigned to that form on submit. The I came across another respected blogger in the community Clayton Cobb. He was responding to this very request and referenced one of his recent posts here: http://social.msdn.microsoft.com/Forums/en-US/sharepointinfopath/thread/689e681f-d46a-4621-a0cf-55fd49a0432a.

A combination of both posts was dead on. My problem, I did not read the post in its entirety and for half a day I was
chasing my tail. Reading the post quickly I saw how they were getting the ID and I figure I could return the ID with a filter where IP(fileName) = SP(Name), but Name is not a field that can be selected in the filter, so I went with Title. This is where I failed. eventually I found out that Title field was blank, but not after much frustration. When I finally identified this issue I republished the form and promoted the IP(fileName) and now the filter could compare this to the SP(fileName). this was a simple, but costly error.

After much trial and error I was final able to build a working solution. The concept is on form load, the form checks a field “filename” if blank set the value to a current DateTime.

concat(substring(now(), 6, 2), "-", substring(now(), 9, 2), "-", substring(now(), 1, 4), " T ", substring(now(), 12, 2), "_", substring(now(), 15, 2), "_", substring(now(), 18, 2))

this formula is SharePoint safe and can still be read as DateTime. Once this value is updated or filename field changes, The form is submitted, saved using the filename. At this point there has been no user interaction. with some additional logic and a few rules I am able to retrieve the form ID from the SharePoint library.

In order to retrieve the ID I needed to promote my filename field. The reason as discussed earlier was the Name field is not a field IP can use, and Title is not getting any data that can be used. By promoting the filename field, You now have a field you can compare to grab the ID. In addition to the fielname field I also added formID field. Once these fields are promoted you need to add this library as a secondary data source. When setting up the data souce add filename as one of the selected fields. This will make that data available to query.

During the same action of fielname change a few steps are needed, here are the actions:

  • Submit using data connection (Submit to Library)
  • Query using data connection (Library Name)
  • Set a field’s value: formID = ID[filename (from list) = filename (from form)]

on the last action the formula is not clean. IP converts the first fielname to a guid. not a big deal, but it is hard to read.

So there you have it. You have learned how to automatically generate a filename for a form on load, save the form, and query the library to grab the form’s ID.

InfoPath addDays


This project I have been on for much time now, feels like forever, I have begun to carve impressive progress. One of the requirements that was needed was a quick start and end date to prepopulate. The form contained start and end date fields in a repeating section. For the most part many entries will be back dated to the first of the month and some stamped for the end of the month. I know with script (code) many things are possible, but I really did not want to add more lines of code for something I believed could be handled with a simple rule.

The first thing I considered was how to implement this. I did not want it taking away from the function of the form, but I needed it to work correctly. I considered using a button control. I removed the fill color and removed the borders. Once I did this it looked like regular text on the form. Now I can format the text and place it anywhere it was needed.

Setting the value to the first day of the month is fairly simple. You can use today() with concat and substring, replacing the “Day” with “01”, like in the code example below.

concat(substring(xdDate:Today(), 1, 4), "-", substring(xdDate:Today(), 6, 2), "-01")

If you notice the first substring, it is actually pulling in the year. When I tried this in the format on the field “mm/dd/yyyy” I received a validation error. Microsoft needs the input in this format “yyyy-mm-dd”, although once the value is written to the date field, it is immediately converted back to the field’s format of “mm/dd/yyyy”. Knowing this will make solving the last day of the month a bit easier, so I thought.

Know that getting the first day of the current month is fairly easy, I figured we could get the first day of the next month and subtract 1 day. This would ensure always getting the last day of the current month. I learned this trick when dealing with Calculated Columns and Date fields in SharePoint. Getting the first day of next month was a little trickier than expected, but eventually figured it out. The initial problem was the date length. The standard date length is 10 characters. When I added 1 to current month if it was a single digit, it returned a single digit. I needed a way to add a leading zero. Good thing I had a need for this same requirement on another project, so was easy to figure out how to add a leading zero and 1 month.

 (concat(substring("00", 1, 2 - string-length(substring(xdDate:Today(), 6, 2) + 1))

The first substring tells us the number of digits and how to format it and the nested substring is grabbing the month value, then adding 1 at the end. This brings us very close, but we are still not quite there. Initially I thought I would be able to subtract 1 from the date and I would be done, but this wasn’t the case. So I did a little research and came across a post of similar request and that used the addDays() function and added a negative 1, perfect. This nailed it on the head.

Now putting it all together here is the last day of the current month:

xdDate:addDays(concat(substring(xdDate:Today(), 1, 4), "-", (concat(substring("00", 1, 2 - string-length(substring(xdDate:Today(), 6, 2) + 1)), (substring(xdDate:Today(), 6, 2)) + 1)), "-01"), -1)

I understand that IP has a calendar picker and this would be easier to open the calendar to make a date selection, but my form could have one to many items added. Using the date picker takes a minimum of 2 clicks per date field. Adding these rules it now takes 1 click. Enjoy!

InfoPath, Microsoft Strikes Back!


It’s been a while since I have posted. It has been very hectic. I am slap dab in the middle of a project and it is kicking my butt. For simplicity purposes I am developing an InfoPath (IP) form for what could be used as a billing system. Although IP could not do this alone it is much easy to develop the UI in IP then to try and replicate its functionality in .NET.

Initially I started out with one single form, but the deeper into the rabbit hole I went the less IP was compliant. My Secondary Data Sources were simple SharePoint (SP) lists. The Sr. Developer dropped some code into SP so any data entered on a list in that site would automagically be updated in a SQL Database. The reason for this was to speed up the data feeds to the IP form. By storing supporting list and the IP form as an XML blob in the db we could write Stored Procedures and pass parameters, thus allowing data filtration before it gets to the form.

Now on the eighth iteration of this form and I’m still struggling a bit with what IP will allow me to do and what needs a bigger hammer to make it work. Several releases prior I went to IP template parts (TP). I chose this path now because I have learned more about the project. Eventually I will roll out many forms which will be variations of the main one. I will be setting them up as templates with prepopulated data. The total number of needed forms is unknown at this time, but I am expecting about 32. Playing with the TPs I figured make one change, and update all, right? Wrong. Well for the most part this is fairly true. Here are some issues I ran into.

When you change or create a TP it has to be added to IP as a control. As an updated TP you have an option to update form with the new TP. This means every form has to be opened to make the update. Most of the time this will be fairly simple except under these conditions

  1. Adding a new field to the TP
  2. Resource files
  3. Button Control IDs
  4. Default values, Rules across TPs (If multiple TP exist on one form)

Let’s start with adding a new field. I did not figure this out right away. It took several modifications to understand when this issue occurred. I found after updating a form with a modified TP the UI of the form looked unchanged (except for the modifications), but when you looked at the schema (field structure) it added a replication of the original node and in addition prefixed all field, group and section nodes in the TP with a “_1”, “_2” etc…. In the figure you will see to nodes, myLineItems and myLineItems_1.

Maybe this is not critical sometimes, but for this project we are depending on the XPATH for every field. If this changes the code on the back end will break. I struggled a bit with this trying to figure out why this happened only sometimes. So I started noting every step each time I updated the TP and began comparing differences. I found when I added a new field to the TP upon update in the form it would create a new replicated section. Now that I found the culprit I needed to find a solution to prevent this. For now it is nothing fancy. I found If I deleted the part and the field nodes from the form, saved the form and closed it, upon reopen I could add the updated TP and keep my original names for all the fields, groups and sections. I’m not sure why Microsoft would build functionality like this. If I copy a file in windows I get an alert to over write or rename. Why not build this into the TPs, giving the user the choice to over write or create with new name?

Moving on to the Resource Files and how Microsoft strikes again. In the attempt to save time when updating TPs I started adding Resource files to the TPs. This way when updated I would not have to re-add or attach them. For XML files it is not such a big deal, but images used in Picture Buttons is a nightmare. Microsoft decided to replicate these also. So a form with several TPs and several Picture Buttons could end up with 15-20 resource files once the TPs are imported into a form. I do have to give them some credit for the data connections. At least these do not replicate, but are renamed with the TP name at the end. No matter how many times it is updated it will keep that name even when you rename it in the main form. So why can’t we have a similar functionality throughout the form? Now each iteration I roll out I find myself going into the resource files and deleting the duplicates, then updating all the picture buttons and renaming the Control ID’s.

So if I create a button, picture or not, in a TP and add it to a form with a specific name, why on updated does Microsoft give it a default Control ID in the main form? If you are running code off the button click event, once it is renamed the function doesn’t fire. Now I have to go back and touch every button and rename the ID to match the form code. I know what you’re thinking; why not name it in the TP before updating. Yes, I already did this and it does not retain this name. Another major fail!

My final complaint is focused on the maintenance of default values and rules across TPs. I created a multiple select for day of the week using a repeating table. Without going into any major details I set 7 default values one for each day of the week and in the header a checkbox to select/unselect all. By default you can see the first default value. A typo on my part added “Sat” first instead of “Sun”. No matter how many time I have changed this, updated, in the TP or deleted the TP from the form it will not update in my final product. I am forced to go into the main form and make this change there. Again for the most part the rules stay intact, but when Microsoft forces me to delete the existence of the TP because it wants to rename it I lose all the rules I have had setup. Not knowing this can be frustrating when published an administrator approved template, launching the form and nothing works.

This process of elimination took many hours or pulling my hair out. Although some of this stuff may sound obvious when you’re in the fox hole we can sometimes over complicate what we are doing, putting more into it than what we really need to. I am hopeful Microsoft can fix some of these issues on the next release of IP, but I am sure that version will have its issues for us to find and deal with.

InfoPath 2010 Rules Management and the People Picker


I have been getting some real time on InfoPath 2010 and currently in the process of developing a code less form. Eventually code will be added for the back end functionality, but for now I will push InfoPath to its limits. I have two issues I am trying to work through. First one is the userName() function not returning a value equal to currentuser. This most likely is related to the Active Directly account, or how it was set up. One of the new features of IP 2010 is the Contact Selector already part of the arsenal. Several things I have found seem to be related to how users are setup in Active Directory (AD). After several hours of play I was able to get a working solution. Once I had a solution I tried to make it a template part so I could make it available to everyone without configuration, which was a major fail. For some reason Microsoft felt the need to limit this functionality.

Setting this up is fairly easy once you know what has to be done. This is done through the Picker field’s task pane, “Show Advanced view” for field details.

  1. Right click on AccountId
  2. Select Properties
  3. Under default value, select the function builder
  4. Type userName() in the Insert Formula window
  5. Click OK
  6. Confirm “Refresh value when formula is recalculated” is unchecked. Doing this will ensure that this rule will only run once and not every time the form is opened.
  7. Click OK
  8. This must be repeated for the DisplayName for optimum experience

Results: The People picker will result to the person who opens the form and saves it for the first time.

Feel free to contact me with aby questions

Chunking Content – Part 6


In Part 5 we reviewed the Map and how the Block plays a role in its structure. This post will review the units of information Blocks and Maps making it easier to apply Design Principles. This part will conclude the Design Phase of writing.

Block
Blocks are relevant chuncks of content with a label.

Map
Maps are a collection of Blocks with a title.

Components
Block

  • One main idea
  • A Label
  • A Separator

Map

  • No more than seven plus or minus two (7 ± 2) related Blocks
  • A title that reflects the purpose or main idea/content

Summary

In the first Five parts we explained the importance of how we write. The different between on-line writing as compared to paper or books. Outling the the changes to support a layout out the the end user finds easy to use and navigate through. The strucure of Maps and Blocks also provided scanability for the users, which allowed for them to quickly find what was needed.

As we move into the Develop Phase we will also describe the principles used and presentation. You will be able to identify the difference between Process and Procedure. Although Process and Procedure have a similar look and feel because they both deal with action the difference will be determine by the Scope and Detail of the information.

Display options from Choice Multiple Select in separate columns


I recently came across a request to display the options from a choice multiple select across multiple columns Like this:.
results

When I began to work on this I had a totally differnt path. My initial thoughts were to create a calculated field, and then place the values into another calc field with an HTML table. I have used tables before in a calculated field with the help od a script from pathtosharepoint.com text to HTML. This direction was impossible. Nothing I was trying would even work. I knew that I could trick sharepoint into reading a Choice field, but this turned out only to be true when it was single select.

So to get started I had to create my choice multiple select field.
“WorkType” – When this is first created it must be created as a single line of text.

“calc” – Second field is a calculated field =[WorkType]

Delete “WorkType”

Create new field
“WorkType” choice, multiple select

The “calc” field now will read the the string from “WorkType” the output will be something like this
;#Choice1;#Choice 3;#

The next set of fields depends on the number of options you have. My demo has 5 options (opt1-5) so I created 5 calculated fields

opt1 =IF(FIND(“Choice 1″,[calc]),”Choice 1″,”")
opt2 =IF(FIND(“Choice 2″,[calc]),”Choice 2″,”")
opt3 =IF(FIND(“Choice 3″,[calc]),”Choice 3″,”")
opt4 =IF(FIND(“Choice 4″,[calc]),”Choice 4″,”")
opt5 =IF(FIND(“Choice 5″,[calc]),”Choice 5″,”")

The formulas are searching the string (in [calc] for a specific value. When you setup yours Choice 1 would be your option 1, same thing for the returned value if true.

This returns the values in each column as it should , but the find formula returns #VALUE! it the formual is false like this:
results

I could not figure out a way to remove the #VALUE!. So I deciede to go with a string replace.

<script type="text/javascript">
var theTDs = document.getElementsByTagName("TD");
var i=0;
var TDContent = " ";
while (i < theTDs.length)
{
  try
  {
    TDContent = theTDs[i].innerText || theTDs[i].textContent;
    if (TDContent.indexOf("#VALUE!") == 0)
    {
      theTDs[i].innerHTML = TDContent.replace(/#VALUE!/,"").replace(/#VALUE!/g,"");
    }
  }
  catch(err){}
  i=i+1;
}
</script>

This looked very clean and the options are displayed in individual column in order.
results

Who said I dead, who said I’m gone!


I know it has been a while since my last post. Much has taken place. I began rebuilding a home and I have started a new job. After my first day at the job I am excited to dig further in. I have dabbled in the SharePoint platform for 7 years now. I have developed several InfoPath forms and created much customization to the SP UI and enjoy this work, but at my last p[osition this was lacking. The tasks I was getting assigned were no where near the type of challenge I need.

In my current role it almost appeared to be too good to be true. It is the kind of work I enjoy all the time. I almost feel like I get to play, and I am paid for it. After my onboarding session I was given and InfoPath form near completion. The original creator had been pulled into other priorities and not able to complete the form functionality. The issue was related to a simple dynamics. When specific conditions are meet an Approval field needs to display. On initial my thoughts of this I figured this was fairly simple, but the author explained that he had been down this path and he felt the issue had something to do with the userName() function in InfoPath returning a case difference in the account name from SharePoint People Picker. During testing within the company 2 user names were getting this issue and the field dynmamics were not working properly.